1. Introduction
1.1. What this package provides
zhmc_prometheus_exporter adapts metrics from the IBM Z Hardware Management Console (HMC) for the Prometheus monitoring system. It is written in Python and uses the zhmcclient package.
1.2. Supported environments
- Operating systems: It has been tested on Linux. Other operating systems are not officially supported.
- Python versions: It has been tested with versions 3.4 through 3.7. Later versions are not officially supported. Earlier versions, including Python 2, are not supported.
- HMC versions: 2.11.1 and higher
1.3. Installation
Due to the language of the exporter and the required dependencies, you are going to need Python & Pip.
1.3.1. Installation with pip
The traditional way is to install with pip. Run
$ pip3 install zhmc-prometheus-exporter
Or, locally run
$ pip3 install .
from the cloned repository.
1.3.2. Installation with make
If you have make on your system, the quickest way is to simply run
$ make install
from the cloned repository.
1.3.3. Install as little as possible
If you do not want to install the package itself, you can also just run
$ pip3 install -r requirements.txt
or, with make:
$ make setup
Instead of running zhmc_prometheus_exporter, you will then run python3 zhmc_prometheus_exporter/zhmc_prometheus_exporter.py from the repository.
1.3.4. Do not install at all: Run as a Docker container
You will have to configure it before you can run it in Docker container virtualisation. Please refer to The exporter in Docker.
1.4. Quickstart
1.4.1. The exporter itself
To sign into the HMC, you have to provide credentials in the YAML format. The file hmccreds.yaml could look something like this (see also the sample in the examples folder):
metrics:
  hmc: 10.10.10.10
  userid: user
  password: password
Furthermore, the file metrics.yaml defines details about the metrics fetching. An example file is in the repository root, for more information on its anatomy see chapter The metrics YAML file.
Put both of these files into /etc/zhmc-prometheus-exporter (or link them). You can then run
$ zhmc_prometheus_exporter
The default port is 9291, you can change it with -p. If you do not want to put hmccreds.yaml and metrics.yaml into /etc/zhmc-prometheus-exporter, you can also specify them with -c and -m respectively.
1.4.2. The exporter in Docker
Follow the normal quickstart guide, but ensure that your hmccreds.yaml and metrics.yaml are in the project home directory. You can then run
$ docker build . -t zhmcexporter
$ docker run -p 9291:9291 zhmcexporter
1.4.3. Demo setup
Beware that using Prometheus and a possible graphical frontend, Grafana, is not the scope of this project. This is a very sparse guide. Consult their documentations if you want anything more complicated than a “three simple metrics” setup.
The Prometheus server scrapes the metrics from the exporter. Get it from the Prometheus download page. A sample configuration YAML is provided in the examples folder. Fill in the IP and port the exporter will run on. If you left it at default, the port will be 9291. From the downloaded directory, you can then run:
$ ./prometheus --config.file=prometheus.yaml
See also Prometheus’ guide.
The Grafana server is a more versatile option to visualise the metrics scraped from metrics. Get it from Grafana. From the downloaded directory, you can then run:
$ ./bin/grafana-server web
By default it will be on
localhost:3000. You will have to set IP and port of the Prometheus server. If you didn’t change it, it’slocalhost:9090. See also Prometheus’ guide on Grafana.
- Create the dashboard in Grafana. A sample JSON is provided in the examples folder. If you want it to work natively, you will have to name your source
ZHMC_Prometheus. If you want to change something, you might find it easier to change it in the Web GUI instead of the JSON file.
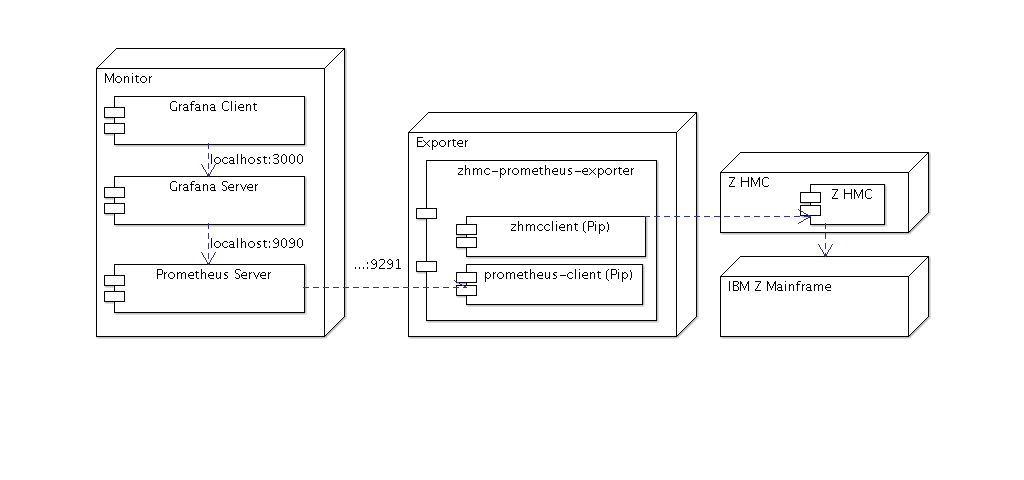
The following image illustrates what the setup described above could look like.
1.5. Reporting issues
If you encounter a problem, please report it as an issue on GitHub.
1.6. License
This package is licensed under the Apache 2.0 License.